Hello! In this post I am going to demonstrate how to put together a simple yet elegant, do it yourself lazy susan turntable tray! You may be wondering, “what do I need a turning plate for?”…so many things! Now that I finally have one I can’t decide where to put it – on the table for condiments? In the living room for drinks or candles? In the family room to house all our remotes? The possibilities are endless 🙂
There are many different ways to make a turning tray, I will show you a clever technique I came up with last week. I will describe the materials you will need, the steps to put it together, as well as possible usages for your creative lazy susan turntable tray.
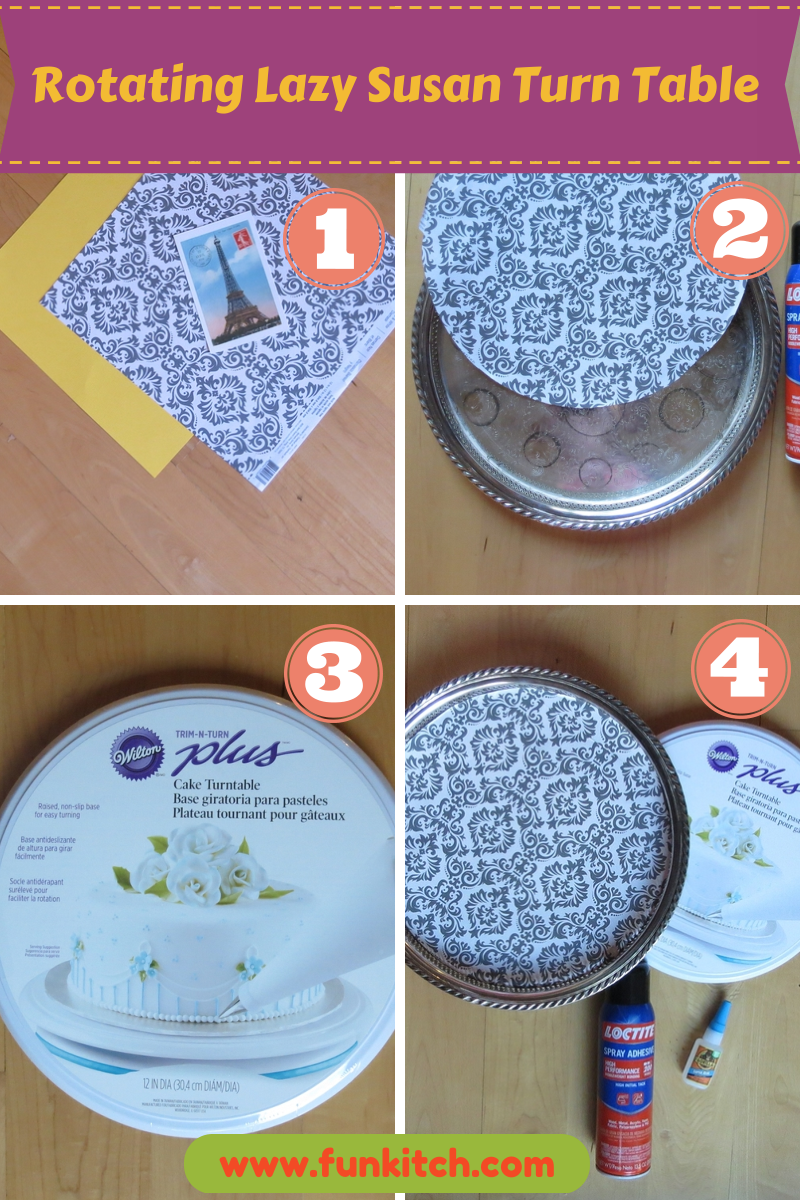
Here is a photo of 4 easy steps to put together a rotating tray:
Put together this stylish turning serving plate in just a few easy steps.
MATERIALS:
– a tray
– a rotating device – I used a Wilton trim and turn turntable (normally used for icing cakes)
– scrapbook or decorative papers
– spray adhesive glue
– postcards, cut-outs, or other designs
– scissors
– glue stick
– Mod Podge
– applicator sponge and/or brush
STEPS FOR ASSEMBLY:
1. Find your rotating device. Several options will work. I used a Wilton cake decorating plate because I was at Michaels and it was convenient for me to grab. My sister-in-law has a pretty lazy susan on her dining room table which was my inspiration. She made hers with an old TV turntable that they had in the house and weren’t using. Maybe you have an old turning spice rack that you could use for your turning device?
2. A tray or plate. I found a pretty silver tray at the thrift shop for $8! I was happy with the find – it looked elegant and functional, perfect! For my sister in laws turning tray, she used a decorative plate from Cost Plus – simple, smart and pretty.
3. If you are not using a decorative plate for the surface of your turning device, come up with your own design. Scrapbook papers, postcards, wrapping paper, and any other designs you like. There are many free printables available online, are all possibilities. I will give you the resource/link for the monogram letter I ended up using in to adorn my tray after these steps.
4. Use a spray adhesive to attach the papers and cut outs to the tray. If you are layering papers you can use a glue stick as well.
5. Cover the top of the paper and designs with Mod Podge or Mod Podge Spray.
6. Allow to dry
That’s it!! Ha! I love this project! I’m going to make more. One for my folks, and maybe one more for the house.
Let me give you a little more detail about where I found materials for MY unique turntable tray described in this blog. I had the Mod Podge and spray adhesive in the house but both can be found and Michael’s arts and crafts. As I mentioned, I picked up a pretty silver tray from a local thrift store. There were many nice trays to choose from there. The scrapbook papers were also from Michaels. I really like monograms – to me they make everything look just a little classier. I decided to look for a simple monogram, an “A” for our family’s last name, ‘Arabian’. There are tons of free monogram printables online. I tried a few and wound up liking one from The Hand Me Down House.
Let’s see, any other tips? Be careful with how much Mod Podge you layer onto the scrapbook paper. Too much will cause puckering and wrinkles. I brushed on the kind that comes in a jar – a lighter look can be achieved using spray adhesive.
VIDEO TUTORIAL:
I’ve talked about how I made a turning tray. I’ve also referenced where I got my inspiration – straight off my sister-in-laws dining table. Here is a photo showing both:

There are many ways to put together a turning tray or plate. In this blog I give instructions on creatively designing a plate of your own.
I hope I have peaked your interest and inspired you to try to make your own turning tray!! Please let me know if you try it and how it turns out in the comments. I would love to hear about it!

cute! please come to my house and make this for me (haha)
Hi Kris! I’d be happy to give you a personal tutorial in Michigan in July 🙂 can’t wait!
I don’t even know how I ended up here, but I thought this post was great.
I don’t know who you are but definitely you are going to a famous blogger if you aren’t already
😉 Cheers!